Thursday, June 30, 2016

Tutorial - How To Make A Non-Slip Fabric Board

I find it much easier to colour fabric with ink and a sponge dauber when my fabric is held securely in place. The way I achieve this is to use a non-slip fabric board. They are quick, easy and inexpensive to make.


You will need an MDF rectangle placemat (mine measures 29 x 21cms or 11 1/2 x 8 1/2 inches), a sheet of wet and dry fine sandpaper and some low tack masking tape.


Simply centre the sandpaper on the placemat and fold the side edges to the back. Secure in place with low tack masking tape. 


All done. How easy was that!!
I use low tack masking tape so I can easily remove the sandpaper when it becomes too messy to be effective. I then simply replace it with a clean sheet. Because the sandpaper is wet and dry it will stand up to many applications of wet media.


Lay your fabric on top and the sandpaper grips it beautifully. It is important you use a fine grade of sandpaper to give you a smooth surface to work on.
You can make your board any size you like bearing in mind you may have to join your sandpaper sheets for larger boards.
I hope this helps you to make fabric art with ease.

Tuesday, June 28, 2016

SOCC Week 4 Challenge: Archival Ink

Once again I have thoroughly enjoyed this weeks challenge and made some new discoveries along the way. I am approaching these challenges as a learning curve for my fabric art, to push me out of my familiar zone and into new techniques.
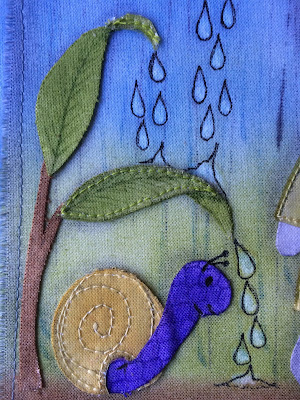
That certainly happened this week. Archival Ink is a staple for fabric art as it is permanent when heat set and stamps crisp images on fabric. However, up till now that is all I have been using it for - stamping. So I wanted to see what else I could do with them and this page was the result.


I challenged myself to use only Archival Inks for the colouring of my page. My palette consisted of: French Ultramarine, Hydrangea, Leaf Green, Chrome Yellow, Magenta Hue, Deep Purple and Coffee.


The petals were coloured, stamped and covered in clear plastic to imitate an umbrella.


I tinted some plastic with Chrome Yellow to create a little rain coat for my cute bunny.


The rain drops were created with rubbing alcohol.


The words are hand written with the Dylusions Black Marble Paint Pen.

I will be back soon to share some Technique Tutorials for my background, tinting plastic and using rubbing alcohol with Archival Inks. Stay tuned.

Monday, June 27, 2016

Thank you Paper Artsy!

I just wanted to pop in to give a big THANK YOU to Darcy from Paper Artsy for organizing the awesome fabric challenge over on their blog. Thank you to the random number generator for selecting my project. I will show you all my prize when I receive it. How exciting!!!

Saturday, June 25, 2016

Paper Artsy Challenge-Fabric #2

I have been playing around with the idea of a fabric art journal with fabric pages primed with gesso. This will allow me to use more of my art supplies and give a really nice feel to my journal. This is the first page of my art journal and I love the way it turned out. Since it was created on a fabric base I have decided to submit it to the Paper Artsy Fabric Challenge here on their blog.

I used a medium weight iron on interfacing on the back of my cotton homespun fabric before priming it with gesso. The result was a really nice canvas feel.


I created my own flower stencil and I used mainly Gelatos with a baby wipe, gesso and Embossing Paste. I have also used some background and letter stamps.


I also used chip board letters and Distress Embossing Powder on the pots.


I stitched some seed beads to the centre of the daisies and added some bling to the other flowers.


I used a crackle paint on the chip board letters.


Here you can see the texture of the embossing powder on the pots. I added some foliage by embroidering a fern stitch next to the pots for some dimension. 
This is the beauty of have fabric journal pages. I can now add a lot more interest and texture to my journal pages by embellishing them with stitching.

Friday, June 24, 2016

Paper Artsy Challenge-Fabric

Over on the Paper Artsy Blog there is an awesome challenge based on the use of fabric. I was so inspired by the many beautiful examples of textile art on the blog. My favourite, of course, were the fabric books by Frances Pickering and DJ Pettitt. You can check them all out for yourself here on the Paper Artsy Blog.
I decided to create a fabric card using flower stamps in different ways.

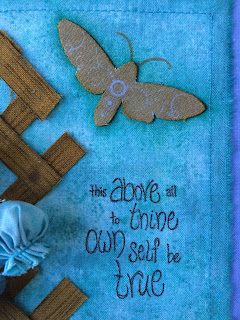
I used the flower, leaf and moth stamps from Paper Artsy's Hot Picks HP1004, HP1008 and HPXT02. The quote is from Squiggly Ink Crowns and Castles SICC7. I also used some dies: Grunge Flower #1 and Grunge Flowers #2 and #3. I coloured my card with Distress Inks and Stains.


Here I have simply stamped the flowers onto coloured fabric backed with a light weight iron on interfacing. I have padded them with wadding and stitched around them.


I gathered the centre of these flowers after stamping them on fabric and cutting them out.


These flowers were made from the largest flower stamp, gathered around some stuffing and stamens. I used jewelry findings to finish them off.


 The little berry flowers were made by cutting flowers using the dies and colouring them with Perfect Pearls for some glimmer. See my Technique Tutorial to learn about colouring fabric with Perfect Pearls. The edges were gathered around some stuffing.


I stamped the moth on the background first and then onto coloured fabric backed with interfacing. I cut it out and glued it over the stamped image.


The inside is plain with a verse and space to write. 


I used printer paper, scrunched, ironed, inked and fused with fusible web. I stitched around the outer edge.


The back of the card is decorated with a plain inked background to match the cover.

Thanks for stopping by.

Wednesday, June 22, 2016

Technique Tutorial-Keeping Stenciled Letters Straight

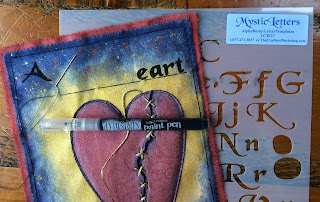
Using lettering stencils is a great way add words to your project as I did on my fabric page for the SOCC Week Three Challenge. But, you may well ask, how can I keep my lettering straight without marking my fabric? Well it really is a simple process and I will share it with you now.


 I used a lettering stencil, the Dylusions Paint Pen in Black Marble and a needle threaded with black thread.


 Lay a ruler where you want your lettering to be. Take your needle and thread and take a small stitch at the end of your word/sentence. Leave about a 5cm (2 inch) tail hanging at the side. Take another small stitch about 4cm (1 1/2 inches) along the ruler. The measurements are not important, I just wanted to give you an idea. Adjust to suit your project. Continue until you have a line long enough for your word/sentence and leave the needle and thread hanging at the side.
Stencil your word/s being sure to clean your stencil after each letter so you don't transfer unwanted black paint to your project.


After you have finished stenciling, simply pull the needle and thread out of the fabric and you are left with perfectly straight lettering and no unsightly guide lines. Too easy!

Tuesday, June 21, 2016

Technique Tutorial-Distress Ink and Perfect Pearls Foil Fleck Background

PLEASE NOTE: Distress Ink and Perfect Pearls are not permanent on fabric and are only suitable for art projects that will not be laundered.

I loved experimenting with Perfect Pearls on my last fabric page for the SOCC Week Three Challenge. Inspired by Tim's "Perfect Splatter Distress" technique, I discovered a way to make the Pearls look like foil flecks on my fabric background.

I started by creating a layered background with Distress ink using Tim's "Wrinkle Free Distress" technique. If you are unfamiliar with this technique you can learn all about it and many other techniques by taking Tim's Creative Chemistry 101 and 102 online classes. You can find more information over at Online Card Classes.


I began with my lightest colour first, in this case Stormy Sky. Don't forget to iron the background (wool setting and no steam) from the right side between each colour addition.


Next I added Faded Jeans.


Finally I added Chipped Sapphire. I later also inked around the edges with Chipped Sapphire.
Next the fun begins with the Perfect Pearls.


I pounced Sunflower Sparkle all around the border of the heart. Check out my Technique Tutorial-Perfect Pearls on Fabric to see how I achieved this.
To create flecks, simply pinch some Pearls between your thumb and fore finger and sprinkle it over the Distress Ink background. Be sure to vary the blobs of Pearls but don't make then too big. I used both Forever Red and Sunflower Sparkle Perfect Pearls.


 This picture gives you an idea of the size of the sprinkled blobs.
Next, using a Mini Mister, spritz lightly but thoroughly all over the Perfect Pearls with water. Make sure the Pearls are wet but not flooded.
To make them look like foil flecks, take an iron on a wool setting, no steam and iron on the right side with an up and down motion over the Pearl blobs. The Pearls seem to melt into the background and become shiny. Flip the fabric over and iron on the wrong side as well. Any excess Pearls will come away and you will be left with little shiny foil like flecks.


This is how it looks after you iron your background fabric. Magical!

I hope you enjoyed this tutorial and will try it out for yourself.

Monday, June 20, 2016

Technique Tutorial-Perfect Pearls on Fabric.

PLEASE NOTE: Perfect Pearls are not permanent on fabric and are only suitable for art projects that will not be laundered.

I used Perfect Pearls on fabric for the first time on my fabric page for the SOCC Week Three Challenge. They are so simple to work with and blend beautifully. They give a gorgeous sparkle to fabric and adhere really well. Just follow these simple steps and you will have a lovely piece of glitzy fabric in no time.

I started with dry cotton fabric backed with some light weight iron on interfacing.

I am using Forever Red Perfect Pearls for my heart. Dip the soft brush that comes with the Pearls into the pot and add a generous amount to the fabric with a gentle pouncing action. Avoid sweeping the brush from side to side as you will dust the powder off the fabric surface. You will want to be generous with the Pearls but be sure to work it into the fabric weave not leaving loose piles of powder on the surface. 


To add some depth and shading I am using Blue Smoke Perfect Pearls around all the edges of the heart including the broken edge. Repeat the same process as for the heart centre but this time keep the brush only half on the edge of the heart. Some of the pearls will land on your work surface, just scoop it up with your brush and continue around the edge. As you can see, Perfect Pearls blend beautifully together.
The next step is to fill a Mini Mister with water and lightly but thoroughly spritz with water all over the Pearls. It is very important to use a Mini Mister as you need a really fine all over misted spray for this technique to work. Avoid flooding the Pearls. You will see the Pearls glisten as they come into contact with the water.


This photo of my backing fabric picks up the glisten a little. It is hard to photograph!
Now it is important to leave it to air dry. This will take some time depending on your climate. You can tell if it is dry simply by feeling it. When you touch the surface, if there are still loose particles of Pearls, you will need to spritz with more water and allow to dry.


You can leave the Pearls as they are, but I decided to over stamp the dry Pearls with the "Curly Background" stamp by Kaszazz and Fired Brick Distress Ink. I like the embossed look it gave to my heart.


I tried to capture the lovely sparkle of the Pearls but the photos really just don't do it justice.

So there you have it! A really simple technique but with stunning results.


Saturday, June 18, 2016

SOCC Week 3 Challenge: Distress Inks and Perfect Pearls.

Do not let the issues of life harden your heart.

This is the third week of Summer of Creative Chemistry 2016 and I found this challenge to be very challenging indeed. I have never used Perfect Pearls on fabric before so this was very new for me. I have been delighted with the results and I now have a new medium to use in my fabric art. I am so grateful to Tim for setting these challenges and Online Card Classes for hosting them. They have pushed me out of my familiar zone and helped me to discover new techniques which I am very excited to be able share with you here on my blog.


I created my background by layering Stormy Sky, Faded Jeans and Chipped Sapphire Distress Inks. I was able to achieve what looks like foil flecks over the background using Forever Red and Sunflower Sparkle Perfect Pearls. Sunflower Sparkle surrounds my heart and Forever Red was used on my backing, bordering my page.
I will be doing a tutorial on my background.


I created my heart using Forever Red Perfect Pearls in the background. I used Blue Smoke Perfect Pearls for shading. I over stamped my heart with "Curly Background" by Kaszazz and Fired Brick Distress Ink. I think it created a neat embossed look to my heart. The crack is backed with Chipped Sapphire Distress Ink and stitched with gold embroidery thread. I have padded my heart to give it a soft look.
I will also be doing a tutorial on using Perfect Pearls on fabric.


I used a lettering stencil and the awesome Dylusions Paint Pen in Black Marble for my words. I love the fine tip on the Dylusions Paint Pens and they work really well with fabric. I am super pleased with them and use them often. To finish I couched the gold embroidery thread to my background.
I will show you how to keep your words straight when using stencils in another post.

I really enjoyed creating this page using Perfect Pearls because it was such a challenge. I'll be back soon with some technique tutorials.

Friday, June 17, 2016

Technique Tutorial- Distress Stain Background

PLEASE NOTE: Distress Inks are not permanent on fabric and are only suitable for art projects that will not be laundered.

I so enjoyed creating my last project for the SOCC Week Two Challenge that I thought I would put together a quick tutorial on how I created the background for my fabric page.


The first step was to lightly spray my fabric with water. I then applied Tea Dye Stain all over and Brushed Corduroy Stain in random places. I found the Stains to be much more stable on fabric than the Distress Inks. However I still ironed my fabric (from the right side) just to stop my colours moving.


Next I "spritzed and flicked" my stained background with water and ironed.


Then I spread out some Walnut Stain on my craft sheet (apologies for my stained craft sheet, it is well used), making sure I had different sized droplets.


I then went ahead and randomly "stamped" small sections my background into the Walnut Stain and ironed it.


I used the brick stamp from the "Bitty Grunge" by Stampers Anonomous and the "Crackle" stamp from Kaisercraft with Espresso Archival Ink. I again ironed it from the right side.


I applied some Picket Fence Stain to my craft sheet and used my finger to apply the stain in random places on my background just to add some highlights. I again ironed it.


I stamped some background foliage using "Nature's Elements" clear stamps by Stampers Anonymous and Fern Archival Ink.


Finally I smudged some Vintage Photo Distress Crayon around the stone door trim for shading.

I hope this tutorial will help you to create your own backgrounds with Distress Stains.