Wednesday, July 27, 2016

SOCC Week 8 Challenge - Distress Inks and Embossing Powders

Well here we are in the final week of Summer of Creative Chemistry. I am sad to see these challenges come to an end but I am excited to be part of Creative Chemistry 103 due to start August 1st 2016.
Unfortunately, I missed Week 7 as I was busy with another project using, you guessed it, fabric and Distress. I will feature my project in an upcoming post. I will still complete the Week 7 Challenge and post the page on my blog soon.
This week the challenge was to use Distress Ink and Embossing Powders. I chose Distress Embossing Powders as I love the varied effects I can achieve with them.


I have edged my base fabric layer with Dusty Concord Distress Stain.


I created my background by layering Scattered Straw, Wild Honey and Rusty Hinge Distress Inks. I sprinkled some Dusty Concord Distress Embossing Powder randomly over my background and heat set it with an iron under my fabric. I stamped the Kaisercraft "Script" stamp with Vintage Photo Archival Ink. I stamped the dots with a stamp from the "Bitty Grunge" set by Stampers Anonymous with Distress Embossing Ink and gold embossing powder.


I painted the vase with Rusty Hinge and Forest Moss Distress Paints. After adding some decorative stitching, I sprinkled some Vintage Photo Distress Embossing Powder over the Rusty Hinge and Clear Embossing Powder over the Forest Moss. I once again heat set with an iron under my fabric. I was going for a terracotta look. I also added some Clear Embossing Powder to the inner top lip of the vase to indicate glazing. I edged the vase with Walnut Stain Distress Ink.


I printed my words onto ordinary copier paper and applied Wild Honey Distress Stain over them. I sponged some Wild Honey Distress Ink around them. I grunged them up a bit and distressed the edges with Walnut Stain Distress Ink. I created the shadow for my words and vase with Vintage Photo Distress Crayon.
I coloured the stems with Forest Moss Distress Stain. The leaves were coloured with Crushed Olive and Forest Moss Distress Markers.
The flowers were created by colouring the petals with Dusty Concord and Wild Honey Distress Inks. I then edged the petals with watered down PVA glue and dipped them into Dusty Concord Distress Embossing Powder. I heat set them with my embossing tool and the glue bubbled up and caused some pretty cool texture. It also has the added bonus of sealing the edge of the fabric.


For the flower centres, I cut a circle and covered it with watered down PVA glue and Scattered Straw Distress Embossing Powder. I heat set it and repeated the process. The release crystals became trapped in the glue and embossing giving a wonderful texture. I pounced some Wild Honey Distress Ink over the surface to add some depth.
I have so enjoyed these challenges and the wonderful effects that can be obtained using Distress products and fabric. 
I am going to hold off constructing my book until after Creative Chemistry 103. I will be setting myself some more challenges as a result of those classes and adding those pages to my book.
Stay tuned for a belated Week 7 Challenge page!

Thursday, July 14, 2016

Happy Mail From PaperArtsy

I love receiving parcels! 


A big thank you to PaperArtsy for my wonderful prize for their recent blog challenge.
I am looking forward to playing with the Infusions range on my fabric pages. I will post my experiments when I have some free time. The colours are amazing!

Monday, July 11, 2016

SOCC Week Six Challenge - Layering Stencils

This week on Summer of Creative Chemistry the challenge was to use two of Tim's stenciling techniques from Creative Chemistry 102
I chose the "Mixed Media Technique" for my background and the "Stencil Stamping Technique" to add texture to my flower petals.
This page was inspired by one of our church's songs we sang last Sunday. It was stuck in my head the whole time I was creating my page. It is called "Oh We Look To The Son" by Hillsong Worship. You can listen to it here. It's awesome!


I used Peacock Feathers, Evergreen Bough, Mermaid Lagoon, Rusty Hinge and Fossilized Amber Distress Inks and Paints.
The stencils I used in my background were Measured, Burlap, Harlequin, Dot Fade, Bubble and Stripes.


I created my own stencil for the flowers. I used the Crackle stencil with Tim's "Stencil Stamping Technique" to add some texture to my petals. Shading was added around the petals background with Mermaid Lagoon Distress Crayon and around the flower centre with Rusty Hinge Distress Crayon. I added a highlight to the flower centres using Picket Fence Distress Paint.


I used the Rays stencil and Metallic Gold Embossing Paste to create my sun rays.


I used the Evergreen Bough Distress Marker to create veins in my leaves. I also used the Peacock Feathers Distress Crayon for shading around my leaves and stems. 


I coloured some seam binding with Rusty Hinge Distress Ink (tutorial here), and tied it around my stems.


I used a lettering stencil and the Black Pentel Gel Roller For Fabric Pen for my words.
I really enjoyed singing my way through creating this page. It was so much fun.


Monday, July 4, 2016

SOCC Week 5 Challenge - Distress Paints.

On Summer Of Creative Chemistry, this week marks the beginning of our revision of Creative Chemistry 102. If you would like to learn some great techniques to get the most out of your Distress products, check out Online Card Classes.
Our challenge this week was to use one or more of Tim's techniques using three or more Distress Paints. 
Distress Paints are awesome to use on fabric as they are permanent when dry and are quite fluid and  easy to apply to fabric.


For my fabric page this week I decided to use Tim's Distress Paint Marbling Technique for my background and lolly pops. This technique is a bit more of a challenge when working with fabric especially a larger piece like my page, but it is do-able. This technique reminded me of one of those flat, round, swirly lolly pops and so I was inspired to create a "sweet" little house.
My palette of Distress Paints included Picked Raspberry, Seedless Preserves, Twisted Citron, Mustard Seed and Salty Ocean. I also added some Sunflower Sparkle Perfect Pearls to my background. 
I have a tutorial showing how to apply Perfect Pearls to fabric.


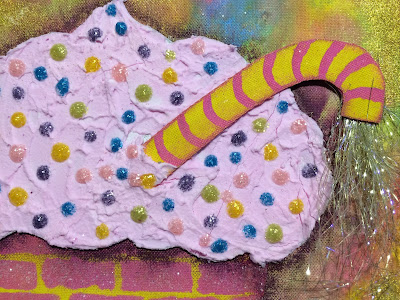
For the roof, I tinted White Embossing Paste with Picked Raspberry Distress Paint. Normally when I use Embossing on fabric it drys quite flexible which is why I like to use it on fabric. In this case however, after I added in the paint, it did crack when I flexed the fabric once it had dried. In hindsight I would probably mount the fabric on some card stock first. Something to bear in mind for next time. The decorations are Distress Stickles. The candy floss coming out of the chimney is Angelina Fibre.


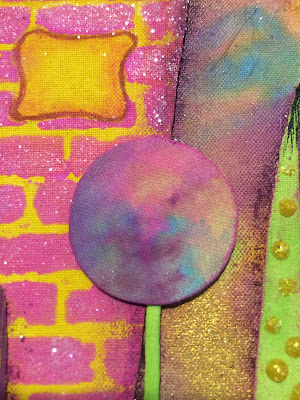
The bricks were created using the "Bricked" stencil, Picked Raspberry Distress Paint, glue and Clear Rock Candy Glitter.


I put a "twist" on the Distress Marbling Technique for my lolly pops.


I used my "Black Pentel Gel Roller for Fabric" pen for my title and applied clear Rock Candy Stickles over the word "Sweet". 
I used the Seedless Preserves and Picked Raspberry Distress Crayons for shading.
I had a lot of fun creating this bright, whimsical page. I hope it brightens your day:)

Sunday, July 3, 2016

Technique Tutorial-Archival inks on Fabric

I really loved playing with my Archival Inks this week on my SOCC Week 4 Challenge Fabric Page.
Archival Inks are one of my staple products when working on fabric as they are permanent once heat set. However, up until now, I have only been using them for stamping. So for this challenge I wanted to see how else I could use them and I loved the results.
I was surprised to discover that although Archival Inks are oil based they will still react with water before they dry on fabric. They don't have the same reaction as Distress Inks but they do wick and slightly deepen in colour. Because of the absorbency of fabric you will have a little more open time to play with Archival Inks before they dry. Once they are dry and heat set they are permanent on fabric and will no longer react with water.


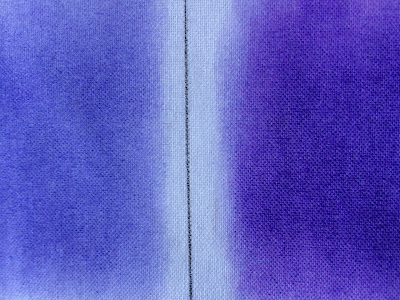
In my sample the colour on the left is Archival Ink "Deep Purple" sponged onto the fabric. The colour on the right is the same colour but it has been spritzed with water before drying.


You can see the colour has wicked out and is more saturated and intense on the right after it has been spritzed with water.


 To apply the inks, lay the fabric on a fabric board and sponge them on with a sponge dauber. The colours are quite light before I spritz with water. After spritzing with water, iron (wool setting, no steam) on the right side. I sponged on more ink where I wanted more colour.


I created "rain" by making marks with my ink pad tilted on its side.


I created some shadow to add depth by applying the ink with a cotton tip around the outline of my design.


This is my finished background waiting for my applique shapes.


Rubbing alcohol is to Archival Inks what water is to Distress Inks. To create my rain drops, I simply placed some rubbing alcohol on a cotton tip and touched it to my fabric where I wanted rain drops. It removed most of the colour in that spot creating a highlighted area even after heat setting. I then just drew droplet shapes around them.
Archival Inks give a beautiful intense colour to fabric and are also permanent. I will definitely be exploring with them again soon.